Notice
Recent Posts
Recent Comments
Link
| 일 | 월 | 화 | 수 | 목 | 금 | 토 |
|---|---|---|---|---|---|---|
| 1 | 2 | 3 | 4 | 5 | 6 | 7 |
| 8 | 9 | 10 | 11 | 12 | 13 | 14 |
| 15 | 16 | 17 | 18 | 19 | 20 | 21 |
| 22 | 23 | 24 | 25 | 26 | 27 | 28 |
Tags
- 네트워크 설정
- 구멍가게코딩단
- 목록처리
- 이터레이터
- 코드로배우는스프링웹프로젝트
- baeldung
- 스프링 시큐리티
- d
- 처음 만나는 AI 수학 with Python
- /etc/network/interfaces
- Kernighan의 C언어 프로그래밍
- 처음 만나는 AI수학 with Python
- GIT
- 리눅스
- 자바편
- 서버설정
- network configuration
- 티스토리 쿠키 삭제
- 자료구조와함께배우는알고리즘입문
- 페이징
- 데비안
- 코드로배우는스프링부트웹프로젝트
- 알파회계
- ㅒ
- 자료구조와 함께 배우는 알고리즘 입문
- 스프링부트핵심가이드
- iterator
- 친절한SQL튜닝
- 선형대수
- resttemplate
Archives
- Today
- Total
bright jazz music
[Spring security] 1.1 프로젝트 구성과 의존성 추가 본문
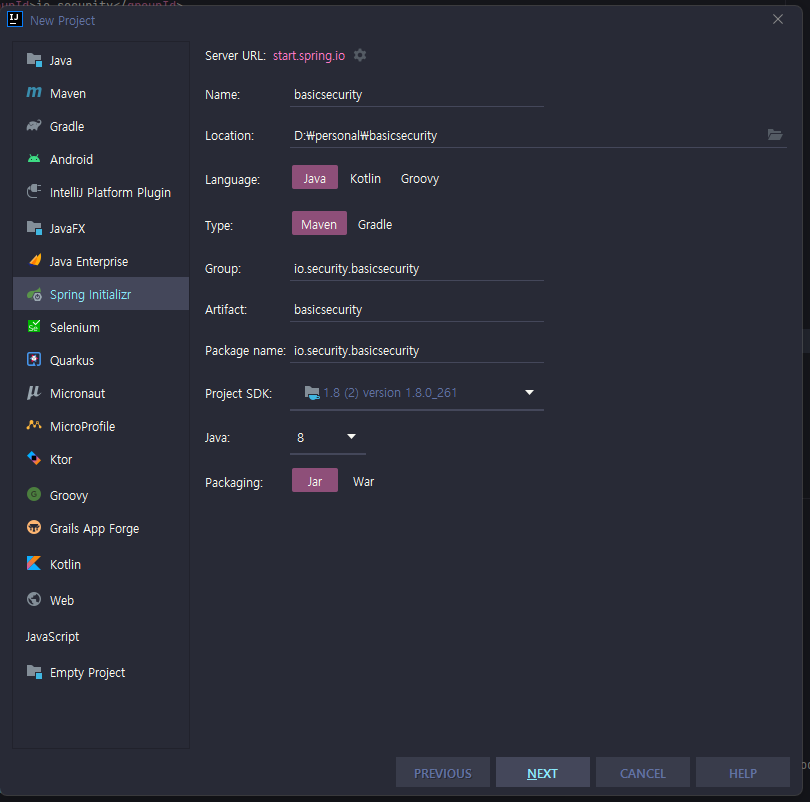
1.1. 프로젝트 구성


1.2. 테스트를 위한 컨트롤러 생성(SecurityController.java)

package io.security.basicsecurity;


import org.springframework.web.bind.annotation.GetMapping;
import org.springframework.web.bind.annotation.RestController;

@RestController
public class SecurityController {

    @GetMapping("/")
    public String index(){
        return "home";
    }
}
1.3. main 메서드 실행

브라우저를 열고 아래의 주소 입력
http://localhost:8080

==> 아직 스프링 시큐리티를 적용하지 않았기 때문에 자유롭게 진입할 수 있다,
1.4. Spring Security 의존성 추가
pom.xml 파일에 아래의 코드를 삽입하여 의존성 추가
<!-- pom.xml -->


<!-- Spring security 의존성 추가 -->
<dependency>
    <groupId>org.springframework.boot</groupId>
    <artifactId>spring-boot-starter-security</artifactId>
</dependency>
아래는 pom.xml 파일 전문
<!-- pom.xml 전문 -->

<?xml version="1.0" encoding="UTF-8"?>
<project xmlns="http://maven.apache.org/POM/4.0.0" xmlns:xsi="http://www.w3.org/2001/XMLSchema-instance"
         xsi:schemaLocation="http://maven.apache.org/POM/4.0.0 https://maven.apache.org/xsd/maven-4.0.0.xsd">
    <modelVersion>4.0.0</modelVersion>
    <parent>
        <groupId>org.springframework.boot</groupId>
        <artifactId>spring-boot-starter-parent</artifactId>
        <version>2.7.3</version>
        <relativePath/> <!-- lookup parent from repository -->
    </parent>
    <groupId>io.security</groupId>
    <artifactId>basicsecurity</artifactId>
    <version>0.0.1-SNAPSHOT</version>
    <name>basicsecurity</name>
    <description>basicsecurity</description>
    <properties>
        <java.version>1.8</java.version>
    </properties>
    <dependencies>
        <dependency>
            <groupId>org.springframework.boot</groupId>
            <artifactId>spring-boot-starter-web</artifactId>
        </dependency>

        <!-- Spring security 의존성 추가 -->
        <dependency>
            <groupId>org.springframework.boot</groupId>
            <artifactId>spring-boot-starter-security</artifactId>
        </dependency>

        <dependency>
            <groupId>org.springframework.boot</groupId>
            <artifactId>spring-boot-starter-test</artifactId>
            <scope>test</scope>
        </dependency>
    </dependencies>

    <build>
        <plugins>
            <plugin>
                <groupId>org.springframework.boot</groupId>
                <artifactId>spring-boot-maven-plugin</artifactId>
            </plugin>
        </plugins>
    </build>

</project>
1.5. 스프링 시큐리티 적용 후 확인
서버를 재구동한다. 메인 메소드를 다시 시작해도 된다.
그러면 콘솔창에 아래와 같은 로그가 발생한다.
예시)
Using generated security password: 90a415b2-3ab7-4630-9b18-ac94835e0ecc
이것은 추후 기본 로그인 화면에서 사용할 비밀번호이다.
구동이 완료되면 브라우저의 주소창에 localhost:8080을 기입하고 접근한다.

기본 아이디는 user이다.
비밀번호는 콘솔창에 생성된 로그를 이용한다.
ID: user
PW: 90a415b2-3ab7-4630-9b18-ac94835e0ecc
Sign in 버튼을 누르면 이전과 동일한 화면에 진입한다.

'Framework > Spring Security' 카테고리의 다른 글
| 스프링 시큐리티 설정 (1) | 2022.09.13 |
|---|---|
| [Spring security] 1.5 Logout 처리, LogoutFilter (0) | 2022.09.11 |
| [Spring security] 1.4 Form Login 인증 필터 : UsernamePasswordAuthenticationFilter (0) | 2022.09.09 |
| [Spring security] 1.3 Form Login 인증 (0) | 2022.09.09 |
| [Spring security] 1.2 사용자 정의 보안 기능 구현 (0) | 2022.09.08 |
Comments


