| 일 | 월 | 화 | 수 | 목 | 금 | 토 |
|---|---|---|---|---|---|---|
| 1 | ||||||
| 2 | 3 | 4 | 5 | 6 | 7 | 8 |
| 9 | 10 | 11 | 12 | 13 | 14 | 15 |
| 16 | 17 | 18 | 19 | 20 | 21 | 22 |
| 23 | 24 | 25 | 26 | 27 | 28 |
- 티스토리 쿠키 삭제
- d
- 데비안
- 처음 만나는 AI 수학 with Python
- network configuration
- 스프링부트핵심가이드
- 네트워크 설정
- 알파회계
- 이터레이터
- 자료구조와함께배우는알고리즘입문
- 자바편
- 자료구조와 함께 배우는 알고리즘 입문
- GIT
- 서버설정
- 구멍가게코딩단
- 코드로배우는스프링웹프로젝트
- baeldung
- 목록처리
- 스프링 시큐리티
- 처음 만나는 AI수학 with Python
- 코드로배우는스프링부트웹프로젝트
- Kernighan의 C언어 프로그래밍
- ㅒ
- /etc/network/interfaces
- 선형대수
- 친절한SQL튜닝
- 리눅스
- 페이징
- resttemplate
- iterator
- Today
- Total
bright jazz music
blog16. Vue.js 설치 본문
참고:
node.js가 설치돼 있어야 한다. 나는 설치돼 있어서 생략했다.
설치 시 아래 블로그의 포스팅 참고
[Error] Node.js 설치 / npm install / bash: npm: command not found 에러
안녕하세요! 이번 포스팅에서는 Node.js를 설치하고 로컬 환경에서 npm install 명령어를 사용할 수 있도록 환경변수 편집까지 해보겠습니다. 우선 Node.js를 설치해줍니다. https://nodejs.org/ko/ Node.js Node.
codest.tistory.com
노드 설치 - 환경변수 설정까지 해주었다.
"'vite' is not recognized as an internal or external command, operable program or batch file."와 같은 문제 발생
아래와 같이 vite를 설치하여 해결
npm install vite
Vite
Next Generation Frontend Tooling
vitejs.dev
https://vitejs-kr.github.io/guide/why.html
Vite
Vite, 차세대 프런트엔드 개발 툴
vitejs-kr.github.io
----------------------------------------
1. 스프링 프로젝트 내에 Vue프로젝트 생성

자신이 vue 프로젝트를 만들고자 하는 경로에서 아래의 명령어를 입력한다.
npm init vue@latest
내 경우 프로젝트 이름은 front로 하였다.
front 디렉토리로 이동(cd front)하여 npm install
npm run lint
npm run dev (서버 실행)


원래 npm run dev 구동 시에 계속 아래와 같은 오류 발생 심지어 해당 경로에 vite.config.ts 파일이 있는데도.
failed to load config from D:\personal\blog\front\vite.config.ts
error when starting dev server:
Error: Cannot find module 'node:url'
Require stack:
- D:\personal\blog\front\vite.config.ts
업데이트 해주니 오류가 사라짐.


- .gitignore파일
: Vue와 관련된 설정들이 들어가 있다. 깃에 올릴 필요 없는 것들이다.

- public
: 퍼블릭하게 접근할 수 있는 리소스가 들어가 있다. favicon이 그 예.
- src/assets : 같이 빌드되어서 올라갈 것들. js, css, etc.
- src/main.ts : 진입점.
- index.html : 처음 나타나는 메인 페이지.
- src/App.vue : index.html에 바인딩 되는 컴포넌트
- router/index.ts :경로에 따라 불러와야하는 view또는 컴포넌트를 정의하는 파일.("/" -> home)
- views/HomeView.vue: / 경로에 대한 view
- views/AboutView.vue: /about 경로에 대한 view
//main.ts
import { createApp } from "vue";
import { createPinia } from "pinia";

import App from "./App.vue";
import router from "./router";

import "./assets/main.css";

const app = createApp(App); //vue.js 앱을 맨들고

app.use(createPinia()); //필요한 프러그인 사용처리
app.use(router);

app.mount("#app"); //#app으로 런치 ==> index.html 렌더링하고 거기에 App.vue 컴포넌트를 렌더링
<!--index.html-->
<!DOCTYPE html>
<html lang="en">
  <head>
    <meta charset="UTF-8">
    <link rel="icon" href="/favicon.ico">
    <meta name="viewport" content="width=device-width, initial-scale=1.0">
    <title>Vite App</title>
  </head>
  <body>
    <div id="app"></div> <!-- 여기에 App.vue 컴포넌트를 바인딩 -->
    <script type="module" src="/src/main.ts"></script>
  </body>
</html>
<!--App.vue-->
<script setup lang="ts">
import { RouterLink, RouterView } from "vue-router";
import HelloWorld from "./components/HelloWorld.vue";
</script>
<template>
<header>
<img
alt="Vue logo"
class="logo"
src="@/assets/logo.svg"
width="125"
height="125"
/>
<div class="wrapper">
<HelloWorld msg="You did it!" />
<nav>
<RouterLink to="/">Home</RouterLink> <!--메인페이지의 메뉴 -->
<RouterLink to="/about">About</RouterLink>
</nav>
</div>
</header>
<RouterView />
</template>
<style scoped>
header {
line-height: 1.5;
max-height: 100vh;
}
.logo {
display: block;
margin: 0 auto 2rem;
}
nav {
width: 100%;
font-size: 12px;
text-align: center;
margin-top: 2rem;
}
nav a.router-link-exact-active {
color: var(--color-text);
}
nav a.router-link-exact-active:hover {
background-color: transparent;
}
nav a {
display: inline-block;
padding: 0 1rem;
border-left: 1px solid var(--color-border);
}
nav a:first-of-type {
border: 0;
}
@media (min-width: 1024px) {
header {
display: flex;
place-items: center;
padding-right: calc(var(--section-gap) / 2);
}
.logo {
margin: 0 2rem 0 0;
}
header .wrapper {
display: flex;
place-items: flex-start;
flex-wrap: wrap;
}
nav {
text-align: left;
margin-left: -1rem;
font-size: 1rem;
padding: 1rem 0;
margin-top: 1rem;
}
}
</style>
// index.ts
import { createRouter, createWebHistory } from "vue-router";
import HomeView from "../views/HomeView.vue";

const router = createRouter({
  history: createWebHistory(import.meta.env.BASE_URL),
  routes: [
    {
      path: "/", //루트 경로라면
      name: "home", //home 뷰를 불러온다.
      component: HomeView,
    },
    {
      path: "/about", //about 경로라면
      name: "about", //about 뷰를 불러온다.
      // route level code-splitting
      // this generates a separate chunk (About.[hash].js) for this route
      // which is lazy-loaded when the route is visited.
      component: () => import("../views/AboutView.vue"),
    },
  ],
});

export default router;
<!--HomeView.vue-->
<script setup lang="ts">
import TheWelcome from "../components/TheWelcome.vue";
</script>

<template>
  <main>
    <TheWelcome /> <!--/components/TheWelcome.vue 컴포넌트 불러옴 -->
  </main>
</template>
<!--TheWelcome.vue-->
<script setup lang="ts">
import WelcomeItem from "./WelcomeItem.vue";
import DocumentationIcon from "./icons/IconDocumentation.vue";
import ToolingIcon from "./icons/IconTooling.vue";
import EcosystemIcon from "./icons/IconEcosystem.vue";
import CommunityIcon from "./icons/IconCommunity.vue";
import SupportIcon from "./icons/IconSupport.vue";
</script>
<template>
<WelcomeItem>
<template #icon>
<DocumentationIcon />
</template>
<template #heading>Documentation</template>
Vue’s
<a href="https://vuejs.org/" target="_blank" rel="noopener"
>official documentation</a
>
provides you with all information you need to get started.
</WelcomeItem>
<WelcomeItem>
<template #icon>
<ToolingIcon />
</template>
<template #heading>Tooling</template>
This project is served and bundled with
<a
href="https://vitejs.dev/guide/features.html"
target="_blank"
rel="noopener"
>Vite</a
>. The recommended IDE setup is
<a href="https://code.visualstudio.com/" target="_blank" rel="noopener"
>VSCode</a
>
+
<a
href="https://github.com/johnsoncodehk/volar"
target="_blank"
rel="noopener"
>Volar</a
>. If you need to test your components and web pages, check out
<a href="https://www.cypress.io/" target="_blank" rel="noopener">Cypress</a>
and
<a href="https://on.cypress.io/component" target="_blank"
>Cypress Component Testing</a
>.
<br />
More instructions are available in <code>README.md</code>.
</WelcomeItem>
<WelcomeItem>
<template #icon>
<EcosystemIcon />
</template>
<template #heading>Ecosystem</template>
Get official tools and libraries for your project:
<a href="https://pinia.vuejs.org/" target="_blank" rel="noopener">Pinia</a>,
<a href="https://router.vuejs.org/" target="_blank" rel="noopener"
>Vue Router</a
>,
<a href="https://test-utils.vuejs.org/" target="_blank" rel="noopener"
>Vue Test Utils</a
>, and
<a href="https://github.com/vuejs/devtools" target="_blank" rel="noopener"
>Vue Dev Tools</a
>. If you need more resources, we suggest paying
<a
href="https://github.com/vuejs/awesome-vue"
target="_blank"
rel="noopener"
>Awesome Vue</a
>
a visit.
</WelcomeItem>
<WelcomeItem>
<template #icon>
<CommunityIcon />
</template>
<template #heading>Community</template>
Got stuck? Ask your question on
<a href="https://chat.vuejs.org" target="_blank" rel="noopener">Vue Land</a
>, our official Discord server, or
<a
href="https://stackoverflow.com/questions/tagged/vue.js"
target="_blank"
rel="noopener"
>StackOverflow</a
>. You should also subscribe to
<a href="https://news.vuejs.org" target="_blank" rel="noopener"
>our mailing list</a
>
and follow the official
<a href="https://twitter.com/vuejs" target="_blank" rel="noopener"
>@vuejs</a
>
twitter account for latest news in the Vue world.
</WelcomeItem>
<WelcomeItem>
<template #icon>
<SupportIcon />
</template>
<template #heading>Support Vue</template>
As an independent project, Vue relies on community backing for its
sustainability. You can help us by
<a href="https://vuejs.org/sponsor/" target="_blank" rel="noopener"
>becoming a sponsor</a
>.
</WelcomeItem>
</template>


-----
원래 강의에서는 mac에서 nodeenv를 설치하여 node 버전을 설정해 준 뒤에 Vue를 설치한다.
내 경우는 윈도우 환경에서의 설치였는데, 맥 환경과의 차이가 있어 진행하다가 귀찮아져 기존의 npm으로 Vue를 설치하여 진행하였다.
.윈도우 환경에 node env 설치
node env를 설치하면 노드 환경을 프로젝트에 맞춰 바꿀 수 있다.
https://github.com/ekalinin/nodeenv
GitHub - ekalinin/nodeenv: Virtual environment for Node.js & integrator with virtualenv
Virtual environment for Node.js & integrator with virtualenv - GitHub - ekalinin/nodeenv: Virtual environment for Node.js & integrator with virtualenv
github.com
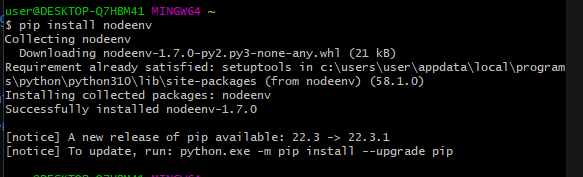
1.1 nodeenv 설치
내 경우 git bash를 관리자 권한으로 실행하여 설치하였다.
1.2 node 설치


node 16.15.0 버전 설치. 환경 이름은 nodeenv-16.15.0
프로젝트 루트 폴더에해당 환경 명으로 폴더가 생긴 것을 볼 수 있다.
1.3 설치한 노드 버 활성화
https://pypi.org/project/nodeenv/
nodeenv
Node.js virtual environment builder
pypi.org
'Projects > blog' 카테고리의 다른 글
| blog17 : 글 작성화면 만들기 2 (1) | 2023.02.01 |
|---|---|
| blog17 : 글 작성화면 만들기 1 (기초) (0) | 2023.02.01 |
| blog15 : Git 자주 쓰는 명령어 예제 2 (0) | 2023.01.30 |
| blog15 : Git 자주 쓰는 명령어 예제 1 (0) | 2023.01.29 |
| blog14 : Github SSH 설정, 프로젝트 올리기 (0) | 2023.01.29 |


