| 일 | 월 | 화 | 수 | 목 | 금 | 토 |
|---|---|---|---|---|---|---|
| 1 | 2 | 3 | 4 | 5 | 6 | 7 |
| 8 | 9 | 10 | 11 | 12 | 13 | 14 |
| 15 | 16 | 17 | 18 | 19 | 20 | 21 |
| 22 | 23 | 24 | 25 | 26 | 27 | 28 |
| 29 | 30 | 31 |
- baeldung
- 코드로배우는스프링웹프로젝트
- 스프링 시큐리티
- d
- 스프링부트핵심가이드
- /etc/network/interfaces
- 구멍가게코딩단
- network configuration
- 처음 만나는 AI수학 with Python
- Kernighan의 C언어 프로그래밍
- 자바편
- 자료구조와 함께 배우는 알고리즘 입문
- 선형대수
- ㅒ
- 코드로배우는스프링부트웹프로젝트
- resttemplate
- 데비안
- iterator
- 자료구조와함께배우는알고리즘입문
- 목록처리
- 친절한SQL튜닝
- GIT
- 페이징
- 이터레이터
- 서버설정
- 네트워크 설정
- 티스토리 쿠키 삭제
- 리눅스
- 알파회계
- 처음 만나는 AI 수학 with Python
- Today
- Total
bright jazz music
[swagger] 1. 적용 (springdoc swagger) 본문
들어가며
스웨거에는 두 종류가 있다.
- springdoc swagger
- springfox swagger
과거에는 springfox swagger가 일반적으로 사용되었다. 그러나 현재는 사실상 업데이트 중지상태이다.
이 포스팅에서는 springdoc swagger를 사용하여 swagger를 적용한다.
springdopc swagger 공식 페이지
OpenAPI 3 Library for spring-boot
Library for OpenAPI 3 with spring boot projects. Is based on swagger-ui, to display the OpenAPI description.Generates automatically the OpenAPI file.
springdoc.org
1. SpringDoc OpenAPI UI 라이브러리 확인
https://mvnrepository.com/artifact/org.springdoc/springdoc-openapi-ui
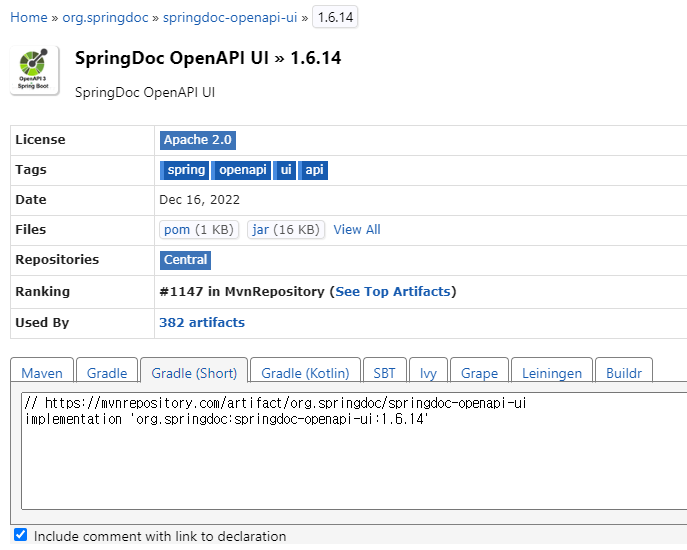
위 라이브러리를 사용할 것이다.
버전은 현재 최신인 1.6.14
짧은 것을 선호하므로 형식은 gradle(short) 사용. 일반 gradle을 사용해도 기능에는 영향 없다.
2. build.gradle에 해당 라이브러리 의존성 추가
//build.gradle
dependencies {
    implementation 'org.springframework.boot:spring-boot-starter-data-jpa'
    implementation 'org.springframework.boot:spring-boot-starter-web'
    compileOnly 'org.projectlombok:lombok'
    runtimeOnly 'com.h2database:h2'
    runtimeOnly 'org.mariadb.jdbc:mariadb-java-client'
    annotationProcessor 'org.projectlombok:lombok'
    testImplementation 'org.springframework.boot:spring-boot-starter-test'

    // https://mvnrepository.com/artifact/org.springdoc/springdoc-openapi-ui
    implementation 'org.springdoc:springdoc-openapi-ui:1.6.14'
}
추가 후 gradle refesh
==> swagger-ui를 스프링부트 애플리케이션에 자동 배포한다.
빌드가 완료되었다면 아래의 자원에 접근할 수 있다.
- html 형식으로 제공되는 swagger ui
- json형식으로 제공되는 OpenAPI description
3. Documentation 페이지 확인
3.1 swagger-ui.html
기본 형식
http://{server}:{port}/{context-path}/swagger-ui.html
내 경우
- {server} : localhost
- {port} : 8080
- {context-path} : /
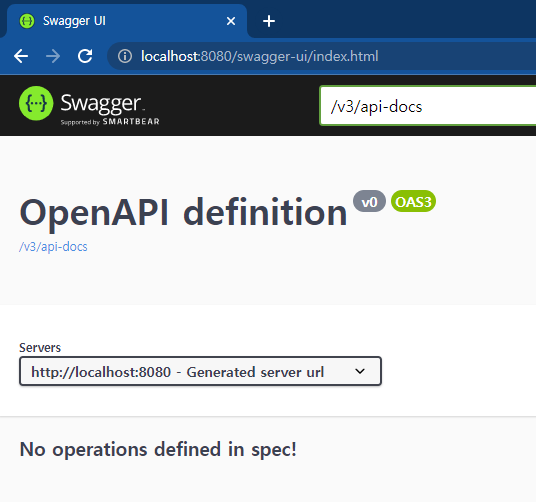
==> http://localhost:8080/swagger-ui/index.html
3.2 api-doc (OpenAPI description)
기본 형식
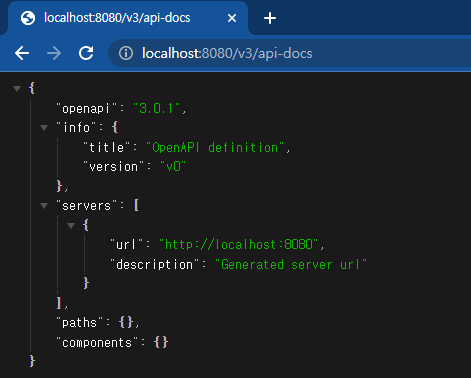
http://{server}:{port}/{context-path}/v3/api-docs
==> http://localhost:8080/v3/api-docs
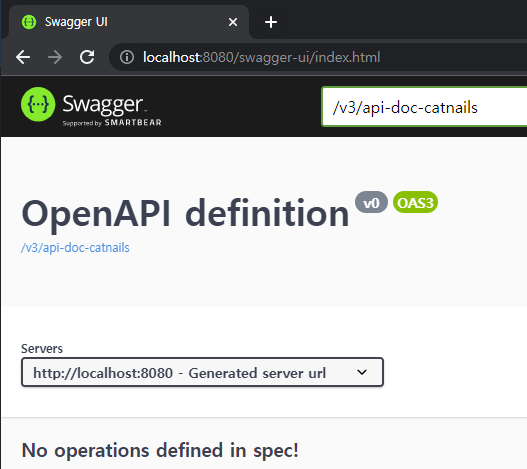
3.3 접근 경로 변경을 원하는 경우
아래와 같이 application.properties 또는 application.yml 파일에서 접근 경로를 변경해준다.
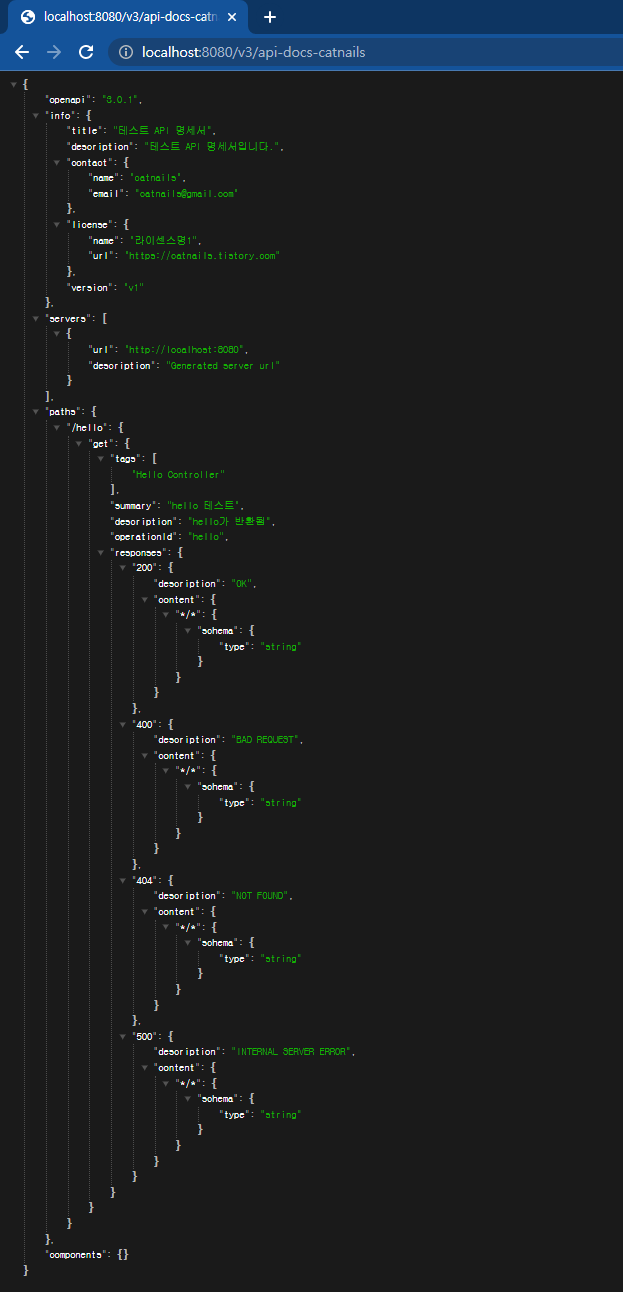
예시에서는 기본 경로 뒤에 "-catnails"라는 문자열을 붙여주었다.
##swagger : springdoc
springdoc:
  swagger-ui:
    path: /swagger-ui-catnails.html # e.g. http://localhost:8080/swagger-ui-catnails.html
  api-docs:
    path: /v3/api-docs-catnails # e.g. http://localhost:8080/v3/api-docs-catnails
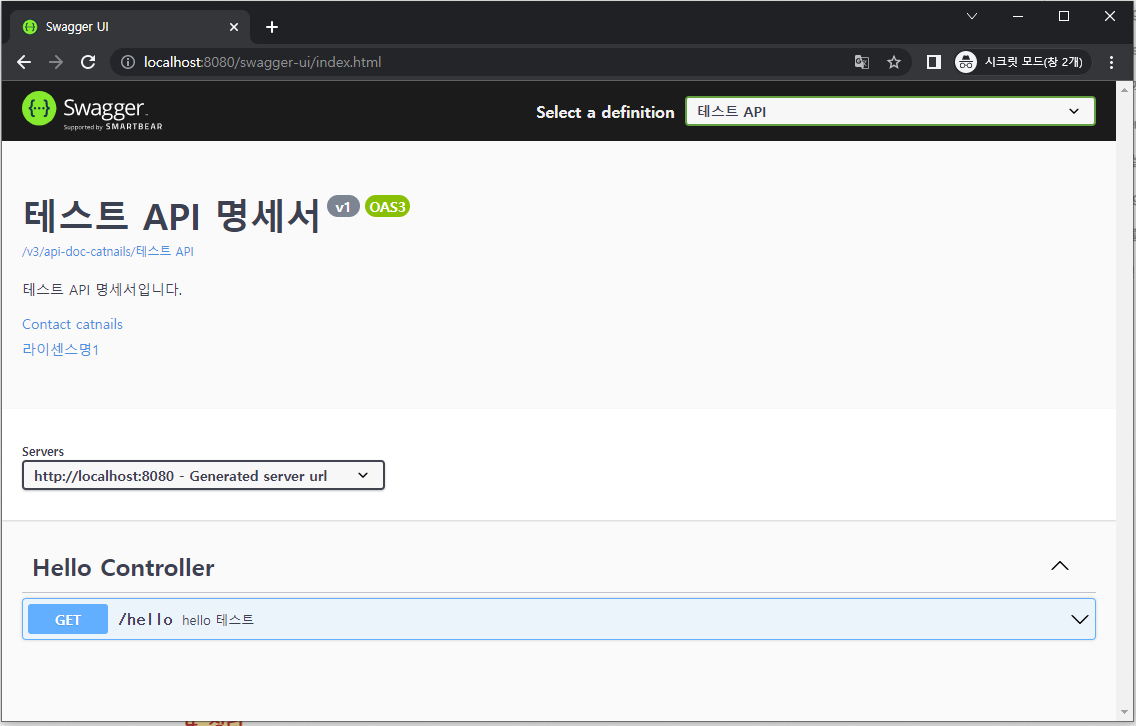
4. Swagger 설정
SwaggerConfig 클래스 생성하여 설정을 작성한다.
//SwaggerConfig.java
package com.project.base.config;

import io.swagger.v3.oas.annotations.OpenAPIDefinition;
import io.swagger.v3.oas.annotations.info.Contact;
import io.swagger.v3.oas.annotations.info.Info;
import io.swagger.v3.oas.annotations.info.License;
import lombok.RequiredArgsConstructor;
import org.springdoc.core.GroupedOpenApi;
import org.springframework.context.annotation.Bean;
import org.springframework.context.annotation.Configuration;

//정보
@OpenAPIDefinition(
        info = @Info(title="테스트 API 명세서",
        description = "테스트 API 명세서입니다.",
        version = "v1",
        contact = @Contact(name = "catnails", email = "catnails@gmail.com"),
        license = @License(name = "라이센스명1", url = "https://catnails.tistory.com"))
)

@RequiredArgsConstructor
@Configuration
public class SwaggerConfig {

    @Bean
    public GroupedOpenApi catnailsOpenApi() {
        String[] paths = {"/**"}; // "/" 아래의 모든 경로에 적용

        return GroupedOpenApi.builder()
                .group("테스트 API")
                .pathsToMatch(paths)
                .build();
    }
}
5. 컨트롤러에 적용
//HelloController.java
package com.project.base.controller;
import io.swagger.v3.oas.annotations.Operation;
import io.swagger.v3.oas.annotations.responses.ApiResponse;
import io.swagger.v3.oas.annotations.responses.ApiResponses;
import org.springframework.stereotype.Controller;
import org.springframework.ui.Model;
import org.springframework.web.bind.annotation.GetMapping;
import java.util.ArrayList;
import java.util.HashMap;
@Controller
public class HelloController {
// Swagger 설정 시작
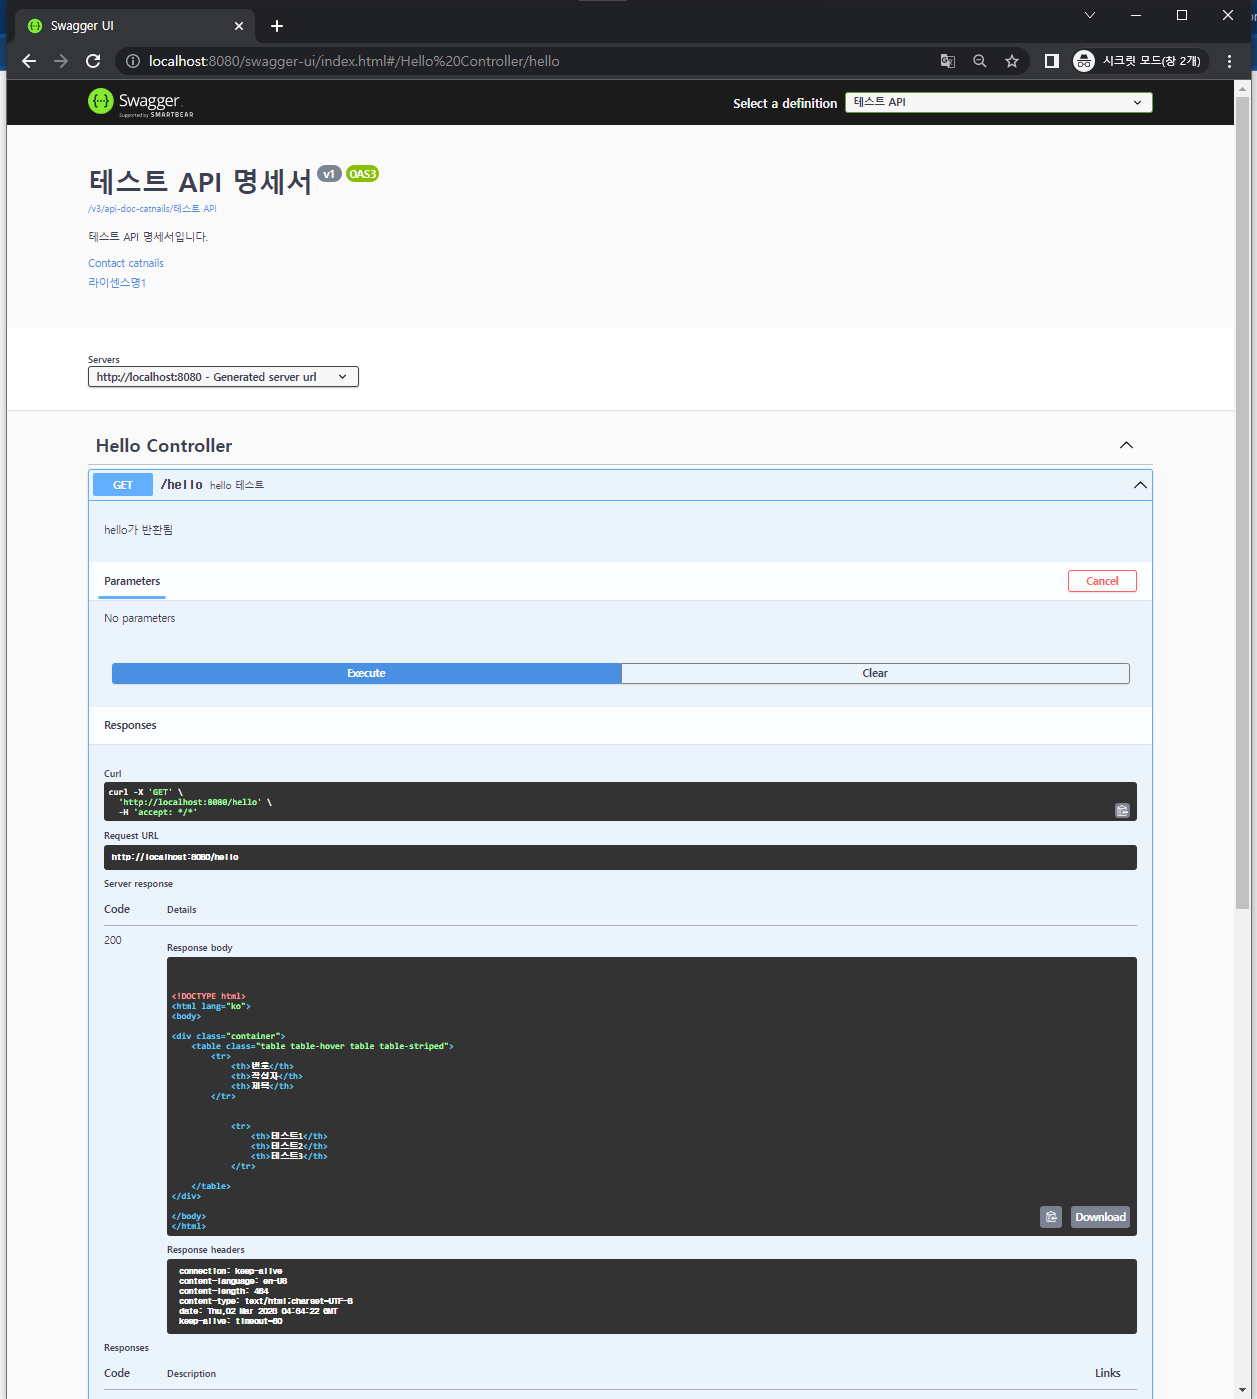
@Operation(summary = "hello 테스트", description = "hello가 반환됨", tags = {"Hello Controller"})
@ApiResponses({
@ApiResponse(responseCode = "200", description = "OK"),
@ApiResponse(responseCode = "400", description = "BAD REQUEST"),
@ApiResponse(responseCode = "404", description = "NOT FOUND"),
@ApiResponse(responseCode = "500", description = "INTERNAL SERVER ERROR")
})
// /Swagger 설정 끝
@GetMapping("/hello")
public String hello(Model model){
HashMap<String, String> helloMap = new HashMap<>();
helloMap.put("1", "테스트1");
helloMap.put("2", "테스트2");
helloMap.put("3", "테스트3");
ArrayList<HashMap<String, String>> helloList = new ArrayList<>();
helloList.add(helloMap);
model.addAttribute("helloList", helloList);
return "manage/hello";
}
}
참고: 위 컨트롤러는 원래 아래의 페이지를 반환한다.

위 페이지는 스프링 부트에서 환경에서의 jsp 사용을 테스트하기 위해 과거에 작성한 jsp이다.
여기서는 새 파일을 작성하기 귀찮아 그대로 사용한 것이다.
테스트를 위해서라면 기본적인 html 파일을 작성하여 컨트롤러로 하여금 반환하도록 하여도 무관하다.
6. 적용 확인
6.1 swagger ui 페이지 확인
접근 경로를 변경하지 않았을 경우 => http://localhost:8080/swagger-ui.html
내 경우는 변경하였으므로 http://localhost:8080/swagger-ui-catnails.html 확인

[Excute] 버튼을 누르면 아래와 같이 결과가 반환된다.
6.2 api-docs 확인
접근 경로를 변경하지 않았을 경우 => http://localhost:8080/v3/api-docs
내 경우는 변경하였으므로 http://localhost:8080/v3/api-docs-catnailis로 접근